In this article we are going to be exploring what is currently thought to be the only known Xbox 360 red lights repair available. The repair that will be outlined in this article has been around for over two years and continues to be responsible for the successful repairs of Xbox 360's all over the world. As more and more people continue to learn that there is a better, more reliable, and cost efficient method to repairing the RROD they are slowly straying away from sending their systems to the manufacturer and are having far more successful results with this specific method. It is for this very reason that I would like to share this method with anyone that may not be currently aware of it and are in need of an Xbox 360 red lights repair.
As the article title states, this is a self-fix-it method and will require that you open up your console in order to make this repair. While this may initially sound like a problem, let me put that worry to rest. There is currently a specific repair guide (the one responsible for bringing this repair to the forefront) that will show you how to do this repair from start to finish that leaves no margin for error what-so-ever. As long as you follow this repair guide step-by-step you will be in good hands and on your way to repairing your system properly.
Soldering Accessories
Now the first step to repairing your console is to have all the appropriate tools and hardware for this specific repair. Some of these tools are common items and you will probably have some of them around the house with the exception of maybe two that will have to be purchased. These items include:
-8 Machine Screws 5X10mm (5mm)
-16 Nylon Washers #10 (5mm)
-16 Steel-Flat Washers - Zinc Plated (5mm)
-T-10 and T-8 screwdriver
-knife or alternative sturdy object to unhook the tabs holding the casing together
-1 paper clip to unhook the tabs hidden inside of the casing
-1 flat head screwdriver to remove the X-Clamps
-Arctic silver 5 thermal compound paste and the Arcti Cleaning Kit
-And 1 pair of standard pliers
With all of these items you are ready to make this repair. First step of the repair process is to dissemble the outer casing of the Xbox 360. Then you will want to remove everything that obstructs your access to the motherboard. Once you have access to the entire mother board you will be able to start the repair process. The first modification necessary for an Xbox 360 red lights repair is to remove the existing thermal compound on the GPU and CPU with the arcti cleaning kit. Once the thermal compound has been removed you will need to then add the arctic silver 5 thermal compound to the GPU and CPU. This thermal compound has proven to be more reliable then the one that has been removed, effectively preventing these chips from overheating when your system gets hot.
The next step of the repair process deals with the heatsinks. In order to make this repair the X-Clamp that originally held the heat sinks in place needs to be removed. Now using the washers and screws from our hardware list, a small modification will be used that will effectively hold the heat sinks in place to the motherboard. This will give the motherboard a sturdier foundation and make it less vulnerable to bending when the system gets hot. See, when the system overheats it causes the motherboard to bend. This is due to the lack of support provided by the X-Clamps. Once you prevent the motherboard from bending, the soldering holding the joints together cannot break, and therefore the GPU and CPU will not be affected and can run smoothly. The whole idea of this Xbox 360 red lights repair is to effectively stop the system from its vulnerabilities to the heat emitted from the Xbox 360.
This repair is very simple once you see it in action and will truly demonstrate it's effectiveness once applied. Since this repair fixes the overheating issues with the 360, it also solves many other errors associated with the Xbox 360. Errors like glitches, freezing, 2 and 4 red light errors, and the E74 error code won't hit your console again. As I said, this Xbox 360 red lights repair is currently the only known solution to the RROD and is also one of the easiest, and quickest repairs available. So if you or someone you know happens to be suffering from the "Red Ring Syndrome" I would highly recommend this repair to anyone who wants a permanent solution.
Special Price!!! Weller D550PK 120-volt Professional Soldering Gun Kit 260/200 Watts
Nov 10, 2011 05:59:54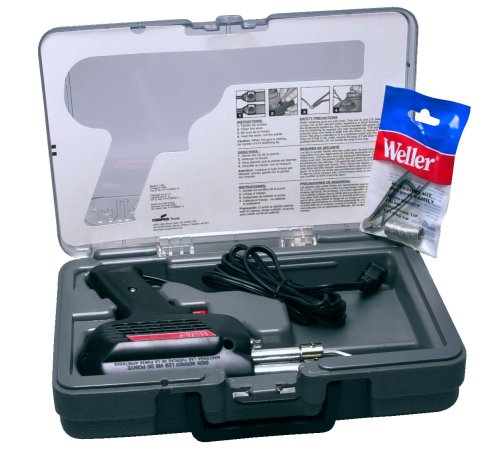
Click for larger image and other views

Weller D550PK 120-volt Professional Soldering Gun Kit 260/200 Watts Feature
- Fingertip trigger selects high (260-watts) or low (200-watts) for controlled output
- Designed with pistol grip for comfort and ease of use
- Features twin lights to illuminate your work
- Heats up quickly; ready to use in only 6 seconds
- Includes an assortment of accessories in a molded plastic storage case
Weller D550PK 120-volt Professional Soldering Gun Kit 260/200 Watts Overview
Soldering Gun Kit 260/200W Soldering Gun With Tin Plated Copper Tip 2 Untinned Tips fluxbrush Soldering Aid Tool Coil 40/60 Rosin Core Solder Plastic Carry Case Soldering Hints Booklet.SAVE NOW on the special offers below!
Available In Stock. |
| This Weller D550PK 120-volt Professional Soldering Gun Kit 260/200 Watts ships for FREE with Super Saver Shipping. |
Price : Click to Check Update Prices Please. |
